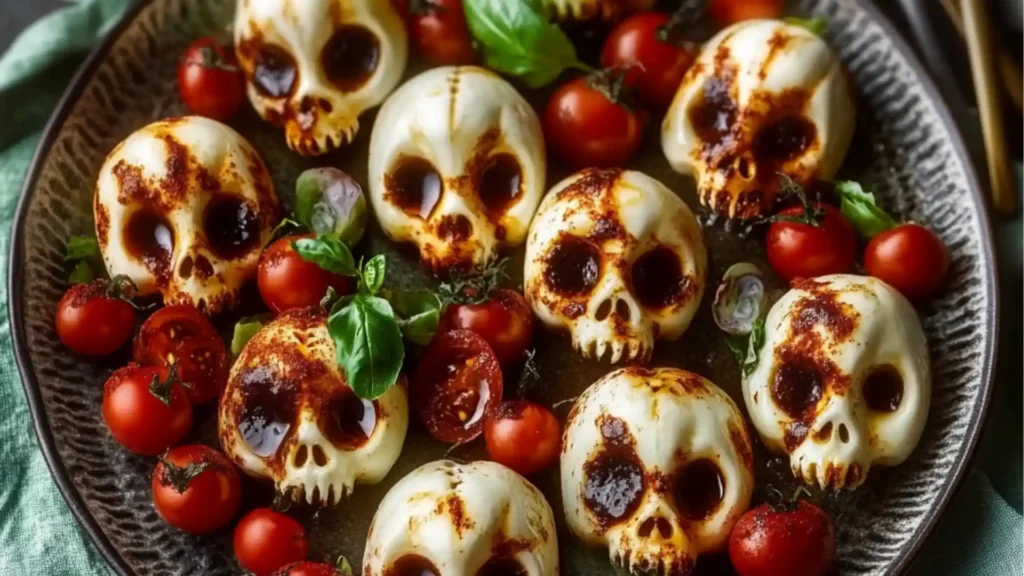
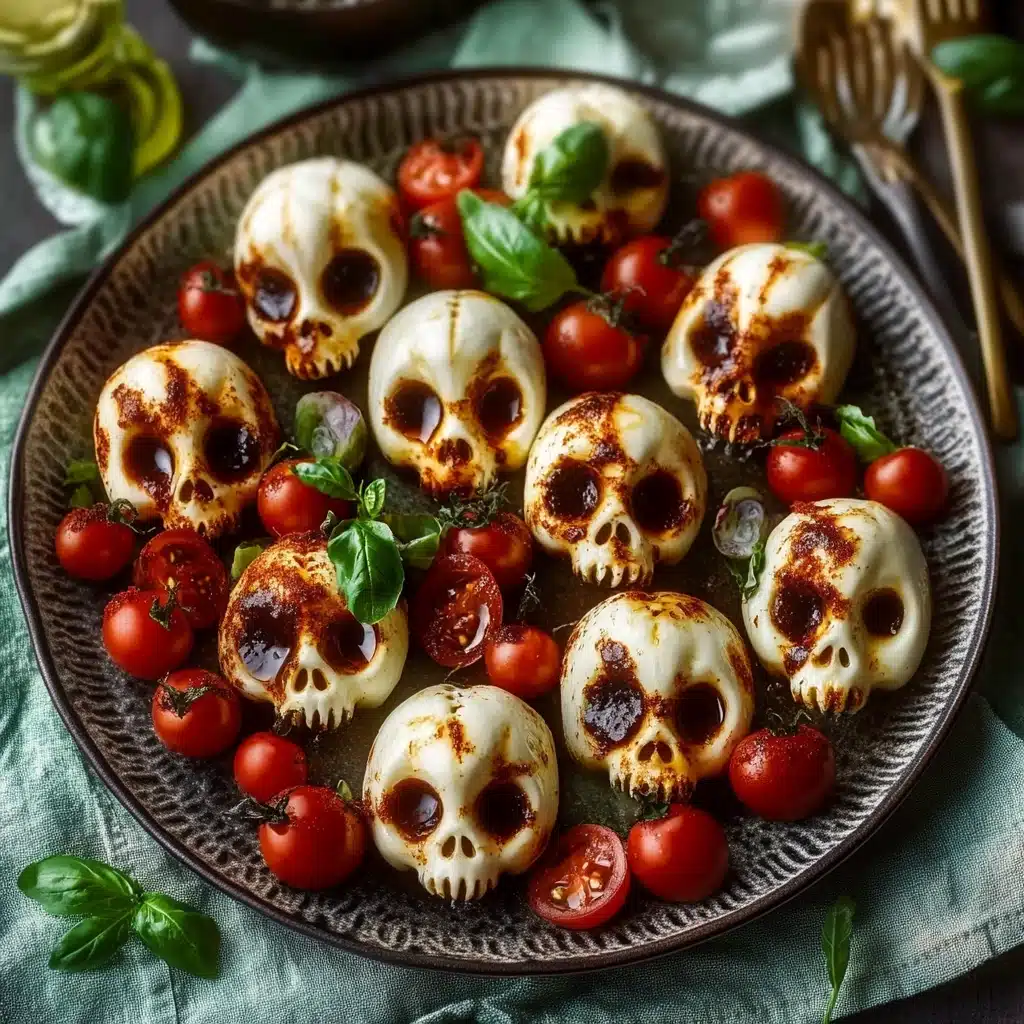
If you’re planning a Halloween party and want something that’s both eerie and elegant, these Spooky Mozzarella Skulls are exactly what your buffet table needs. With the creepy shape of a skull and the classic flavors of a caprese salad, they strike the perfect balance between scary and sophisticated.
Whether you’re organizing a Halloween buffet, themed dinner for adults, or need easy food for a Halloween party that’s more savory than sweet, these mozzarella skulls are sure to turn heads. They’re made using a simple silicone mold food idea, require minimal prep, and can be dressed up in various ways—from Halloween meat appetizers to full-on spooky entrees.
Table of Contents
Why You’ll Love These Scary Halloween Treats for Parties and Food Buffets
These spooky skulls are:
- Eye-catching on any party spread
- Super easy to make with just a few ingredients
- A clever way to elevate skeleton themed food
- Low-carb and keto-friendly
- Great for pairing with meats, veggies, or pasta
- Ideal for both adults and kids at Halloween gatherings
The soft, creamy texture of mozzarella paired with cherry tomatoes and fresh basil delivers that unmistakable caprese flavor. But once molded into skull shapes, they become true scary Halloween treats parties food dreams are made of.
If you’re already loving this kind of fun and creepy presentation, try adding Snake Charmers Pretzels to your spread—they’re equally spooky and snackable!
Ingredients for Spooky Mozzarella Skulls with a Caprese Twist
The recipe itself is simple and requires only a handful of ingredients:
- Fresh mozzarella cheese, sliced or block (about 8 oz)
- Cherry or grape tomatoes
- Fresh basil leaves
- Olive oil
- Balsamic glaze
- Salt and pepper, to taste
These ingredients form the base of a classic caprese, but you can easily customize with additions like olives (for eyes), roasted red peppers, or Italian seasoning.
Want more easy holiday-inspired appetizers? Try these Puff Pastry Bats for a quick savory option that also uses minimal ingredients and prep time.
Tools You’ll Need (Including Silicone Mold Food Ideas)
To make your spooky mozzarella skulls, you’ll need:
- Silicone skull mold – food-safe and oven-safe (found in baking or Halloween sections)
- Sharp knife or cheese slicer
- Toothpicks or skewers – for serving as individual bites
- Small spoon or spatula – to fill molds easily
Silicone molds make it easy to create detailed, three-dimensional designs. You can use them for chocolates, gummies, and even spooky gelatin desserts. They’re versatile tools that belong in every seasonal cook’s kitchen.
You can also use the same molds to make desserts like these Pumpkin Cheesecake Truffles — spooky, sweet, and kid-approved!
Step-by-Step Instructions: How to Make Mozzarella Skulls
Step 1: Prepare the Cheese
Slice the mozzarella into thin pieces or chunks and press into the silicone mold cavities. Fill completely and smooth the tops. You want the mold packed tightly so the cheese holds its shape.
Step 2: Chill to Set
Place the mold in the fridge for 30–45 minutes, or until the cheese is firm and has taken on the skull shape. For extra firmness, you can briefly place it in the freezer for 10 minutes before unmolding.
Step 3: Remove from Mold
Carefully pop out each mozzarella skull. Use a butter knife if needed, but be gentle to keep the shapes intact.
Step 4: Assemble the Skewers
On each skewer or toothpick, layer one cherry tomato, a folded basil leaf, and one mozzarella skull. Repeat for all servings.
Step 5: Season and Serve
Drizzle with olive oil and balsamic glaze just before serving. Sprinkle with a pinch of sea salt and freshly cracked black pepper.
These are the perfect starters to set the mood before serving spooky main dishes or something hearty like Garlicky Kale with White Beans.
Serving Suggestions for Halloween Buffet Food Ideas
If you’re designing a buffet or grazing table, these mozzarella skulls can be served in a variety of creative ways:
- On a spooky charcuterie board with prosciutto, black olives, and mini pickles
- Skewered into a red cabbage head for an eerie centerpiece
- Stacked with black pasta and roasted veggies for a sinister salad
- Nestled among fake cobwebs and mini pumpkins for extra visual impact
If you want a mix of fun and spooky, pair them with Monster Eyeball Pizza or Mini Halloween Pizzas for a variety of textures and flavors.
How to Turn This Into a Spooky Main Dish or Spooky Entree
Don’t be fooled by their size—these mozzarella skulls can also headline your spooky entree menu:
- Serve atop black squid ink pasta with marinara or pesto sauce
- Bake into a stuffed bell pepper or eggplant dish for extra protein
- Top a spooky salad or grain bowl with multiple skulls and seasonal vegetables
Need more dinner-worthy ideas? Check out Pumpkin Chicken Chili for a warm and filling fall meal with a festive twist.
Skeleton Themed Food: Creative Ways to Use Mozzarella Skulls
Create an entire skeleton themed food board by combining:
- Mozzarella skulls for the head
- Breadsticks as bones
- Sliced olives as joints
- Meatballs for the torso
Or make spooky bento-style boxes for kids’ lunches with skulls, blackberries, purple carrots, and Apple Fritter Donuts for dessert.
These little edible skulls are so versatile, you’ll find yourself adding them to all kinds of Halloween dishes.
Make It a Meal: Halloween Dinner for Adults Using These Skulls
Hosting an adults-only Halloween dinner? These mozzarella skulls fit perfectly into a themed multi-course meal:
- Starter: Caprese mozzarella skulls with balsamic drizzle
- Main: Garlic Parmesan Chicken Skewers with roasted butternut squash
- Side: Cheesy Root Vegetable Gratin
- Dessert: Pumpkin Sheet Cake with Cream Cheese Frosting
Serve everything by candlelight with spooky music in the background for a dinner your guests won’t forget.
Pairing Ideas and Halloween Meat Appetizers to Serve Alongside
To balance the vegetarian nature of the mozzarella skulls, add some Halloween meat appetizers to the mix:
- Mini meatball skewers with blackened BBQ sauce
- Prosciutto-wrapped asparagus shaped like witch fingers
- Chicken wings tossed in a bloody-red hot sauce
- Crockpot Fajitas as an easy meat-based main or side dish
This gives your buffet table variety and satisfies all taste preferences.
Tips for Easy Food for Halloween Party Preparation
Planning a party? Save time with these tips:
- Make the mozzarella skulls the day before, store them in an airtight container, and assemble the skewers right before serving.
- Use colorful toothpicks or mini skewers for added decoration.
- Prep your basil and tomatoes ahead of time and store in sealed containers to keep fresh.
- Use disposable or themed platters to make clean-up a breeze.
If you’re serving kids, try fun additions like Fruit Dip with fruit kabobs for a balanced snack tray.
How to Store and Prepare Ahead for Party Day
- Store prepared mozzarella skulls in the refrigerator for up to 3 days
- Wrap them tightly in plastic or store in an airtight container to maintain shape and moisture
- Do not freeze, as freezing changes the texture of fresh mozzarella
Consider doubling the recipe if you’re hosting more than 6 guests—these go fast!
Common Mistakes to Avoid with Mozzarella Molding
- Don’t overfill the molds — it makes them hard to remove cleanly
- Don’t skip the chilling step — warm cheese won’t hold the skull shape
- Avoid wet mozzarella — pat slices dry before pressing into the mold
Want more no-fail spooky recipes? Check out Cockroach Cupcakes for a surprisingly tasty and terrifying dessert.
FAQs About Spooky Mozzarella Skulls
Can I use string cheese or shredded cheese?
Not for molding. Fresh block mozzarella or pre-sliced mozzarella is best for shape retention.
Can I color the mozzarella?
You can gently dye it using beet juice or food-safe charcoal powder for darker effects.
Can I serve these warm?
Yes, but they lose their shape once melted. Best served chilled or at room temp.
Can I use this mold for desserts too?
Absolutely. The same mold works for chocolate, pudding, or Pumpkin Truffles.
Final Thoughts + Share Your Skeleton Creations!
These Spooky Mozzarella Skulls are more than just a Halloween appetizer—they’re a fun, festive, and flavorful addition to any spooky celebration. From kids’ parties to grown-up dinners, they add instant character to your table and can be adapted in dozens of ways.
Try them once, and they’re bound to become a yearly Halloween tradition. So grab your silicone molds and start building your skeleton themed food masterpiece!
Don’t forget to tag your creepy creations and share with us. And if you loved this recipe, subscribe for more Halloween inspiration and spooky main dishes coming your way.
Print
Spooky Mozzarella Skulls : The Ultimate Halloween Party Appetizer
- Total Time: 50–55 minutes
- Yield: 12 ghost hand pies 1x
- Diet: Vegan
Description
Vegan Blueberry Ghost Hand Pies are soft, flaky, fruity, and bursting with blueberry flavor. Shaped like adorable little ghosts, these festive treats are perfect for Halloween parties, spooky gatherings, or fun family baking nights. Completely vegan and easily gluten-free, they bake in under 30 minutes and bring a spooky-sweet charm to any fall dessert table.
Ingredients
For the Dough:
- 2 1/2 cups all-purpose flour (or gluten-free flour blend)
- 1/2 teaspoon salt
- 1 tablespoon sugar
- 1 cup vegan butter or margarine, cold and cubed
- 5–6 tablespoons ice water
For the Blueberry Filling:
- 1 1/2 cups fresh or frozen blueberries
- 2 tablespoons sugar (adjust to taste)
- 1 tablespoon cornstarch
- 1 teaspoon lemon juice
- 1/2 teaspoon vanilla extract
For Decoration:
- Plant-based milk or cream, for brushing
- Vegan chocolate chips or icing, for the eyes
Instructions
- Make the Pie Dough: In a mixing bowl, whisk flour, salt, and sugar. Cut in cold vegan butter until mixture resembles crumbs. Drizzle in ice water gradually until dough forms. Divide into two disks, wrap, and chill for 30 minutes.
- Prepare the Blueberry Filling: In a saucepan, combine blueberries, sugar, cornstarch, lemon juice, and vanilla. Cook 5–7 minutes until berries burst and mixture thickens. Cool completely.
- Roll and Cut Dough: Preheat oven to 375°F (190°C). Roll dough to 1/8-inch thickness. Use a ghost-shaped cutter or stencil to cut out pairs of shapes.
- Assemble the Pies: Place half the ghosts on a lined baking tray. Add a spoonful of blueberry filling in the center, top with another ghost, seal edges with a fork, and poke small steam holes or eye holes.
- Decorate and Bake: Brush with plant-based milk. Bake 18–22 minutes until golden and crisp. Cool, then add chocolate chip or icing eyes.
Notes
Tips for Perfect Vegan Ghost Pies
- Keep dough cold for flaky layers—chill again if it warms.
- Avoid overfilling; too much filling causes leaks.
- Seal edges tightly with a fork to prevent oozing.
- Fresh or frozen berries both work; avoid canned filling.
- Make-ahead: Freeze unbaked pies and bake straight from frozen, adding 5 minutes.
Gluten-Free & Allergy-Friendly Options
- Use a 1:1 gluten-free flour blend with xanthan gum.
- Choose soy-free vegan butter if needed.
- Swap plant milk depending on allergies (oat, almond, rice).
Creative Variations
- Swap blueberries with raspberries, apples, or strawberries.
- Make savory ghosts with roasted veggies and vegan cheese.
- Drizzle icing and sprinkles for frosted ghost pies.
- Cut pumpkin shapes for Thanksgiving versions.
Storage
- Room Temp: Airtight container up to 2 days.
- Fridge: 4–5 days; reheat in toaster oven.
- Freezer: Store unbaked pies in bags; bake from frozen with extra 5 minutes.
Serving Ideas
- Arrange on a spooky dessert board.
- Serve in Halloween-themed cupcake liners.
- Pair with Pumpkin Spice Coffee Creamer, Strawberry Cream Soda, or Brown Sugar Shaken Espresso.
Common Mistakes to Avoid
- Overstuffing—causes messy leaks.
- Poor sealing—edges must be crimped well.
- Skipping chilling—warm dough loses flakiness.
- Underbaking—pies should be golden and crisp.
FAQs
- Can I use store-bought dough? Yes—look for vegan-friendly pie dough or puff pastry.
- Can I make gluten-free? Yes—use a certified GF blend and check all ingredients.
- Can I use another fruit? Absolutely—try strawberries, apples, or peaches.
- Can I make ahead? Yes—dough and filling can be prepped a day ahead or pies frozen unbaked.
- Prep Time: 30 minutes (including chilling)
- Cook Time: 18–22 minutes
- Category: Dessert
- Method: Baked
- Cuisine: American
Keywords: Vegan Blueberry Ghost Hand Pies, Halloween ghost pies, spooky vegan desserts, blueberry hand pies, vegan Halloween recipes