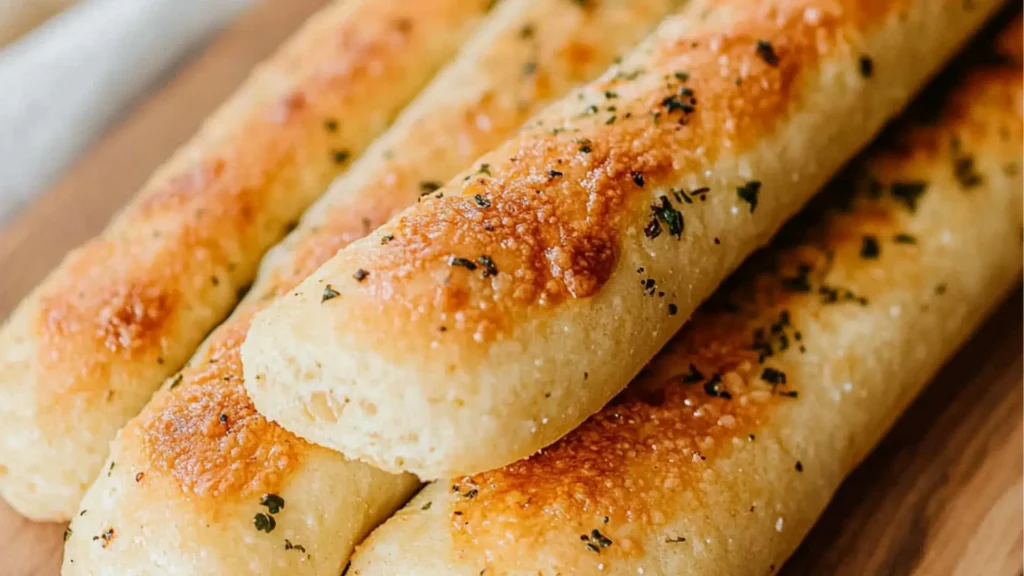
There’s something incredibly comforting about a warm basket of soft, buttery breadsticks. If you’ve ever found yourself dreaming about those iconic Olive Garden Breadsticks—golden brown, perfectly seasoned, and utterly addictive—then you’re in for a treat. This homemade breadsticks recipe captures all the magic of the restaurant favorite, right in your own kitchen.
Whether you’re serving them with pasta, salad, or just enjoying them as a savory snack, these homemade breadsticks are everything you love about dining out, made fresh and with simple ingredients you likely already have on hand. They’re light, fluffy, and brushed with garlic butter that makes each bite absolutely irresistible.
Table of Contents
Why You’ll Love This Homemade Breadsticks Recipe
This isn’t just a copycat. It’s better than the original. These breadsticks are soft, chewy, and loaded with flavor in every bite. Here’s why they’ll become your go-to breadsticks recipe:
- Easy to make with basic pantry ingredients
- Soft and fluffy with a golden crust
- Perfectly seasoned with garlic butter
- Freezer-friendly for make-ahead convenience
- Ideal for beginners in baking homemade bread recipes
Once you make these once, you’ll want to bake them weekly. They complement everything from hearty soups to simple salads or stand alone as a snack.
What Makes Olive Garden Breadsticks So Addictive?
It’s all about the balance—soft and chewy texture, a hint of sweetness in the dough, and that buttery garlic finish. These bread sticks are brushed with seasoned butter both before and after baking, giving them that rich flavor and signature sheen.
This homemade version is incredibly close to the real deal—some say even better. You’ll love how warm and fresh they taste right out of the oven, something store-bought or restaurant bread just can’t compete with.
Essential Ingredients for Authentic Flavor and Texture
The beauty of this bread recipes easy approach is its simplicity. These ingredients work together to create that signature light and tender inside with a slightly crisp exterior.
- All-purpose flour – The base of our dough
- Instant yeast – Helps the dough rise quickly and evenly
- Sugar – Adds a touch of sweetness and activates the yeast
- Salt – For balanced flavor
- Warm water – To bring the dough together and activate the yeast
- Butter – For richness in both the dough and the topping
- Garlic powder & salt – For the flavorful butter topping
These pantry staples transform into magic with a little kneading and resting time.
Full Ingredient List with Exact Measurements
Here’s what you’ll need to make Olive Garden Breadsticks at home:
Dough:
- 1 cup warm water (about 110°F)
- 1 tablespoon granulated sugar
- 1 ½ teaspoons instant yeast
- 2 tablespoons unsalted butter, softened
- 1 ¾ teaspoons salt
- 3 cups all-purpose flour
Topping:
- 3 tablespoons unsalted butter, melted
- ½ teaspoon garlic powder
- ½ teaspoon salt (or garlic salt)
These quantities yield about 12 breadsticks.
Tools You’ll Need to Make Breadsticks at Home
No fancy equipment needed! Just a few kitchen basics:
- Large mixing bowl
- Stand mixer with dough hook (optional but helpful)
- Measuring cups and spoons
- Baking sheet
- Parchment paper or silicone baking mat
- Pastry brush (for the garlic butter)
Even without a stand mixer, you can knead by hand and get excellent results.
Step-by-Step Instructions for Making Olive Garden Breadsticks
Step 1: Activate the Yeast
In a large bowl, combine warm water, sugar, and yeast. Let sit for 5 minutes until foamy. This step proves your yeast is alive and ready.
Step 2: Make the Dough
Add softened butter, salt, and flour to the yeast mixture. Mix until a shaggy dough forms. Knead for 8–10 minutes by hand or 5–6 minutes in a stand mixer until smooth and elastic.
Step 3: First Rise
Place dough in a greased bowl, cover, and let rise in a warm area for 1 to 1½ hours, or until doubled in size.
Step 4: Shape the Breadsticks
Punch down the dough and divide it into 12 equal pieces. Roll each into a rope about 7–8 inches long and place on a lined baking sheet.
Step 5: Second Rise
Cover and let the shaped breadsticks rise for 30–45 minutes, until puffy.
Step 6: Bake
Preheat oven to 400°F (200°C). Bake breadsticks for 11–13 minutes, or until lightly golden.
Step 7: Garlic Butter Finish
While still warm, brush generously with melted butter mixed with garlic powder and salt. Serve immediately!
Pro Tips for Soft, Buttery Homemade Breadsticks
- Measure your flour accurately – Use the spoon and level method to avoid dense dough.
- Don’t over-knead – Too much kneading can make the breadsticks tough.
- Let the dough rise in a warm spot – Like an oven with the light on.
- Brush generously with garlic butter – This is where the flavor shines.
Want even softer breadsticks? Brush them once before baking and again after.
Common Mistakes to Avoid in Bread Stick Recipes
- Using water that’s too hot – Can kill the yeast. Stick to around 110°F.
- Skipping the second rise – Leads to flat, dense breadsticks.
- Overbaking – Keep an eye on the oven. They should be lightly golden, not browned.
- Not covering while rising – Dough dries out without a cover, forming a crust.
Avoiding these small missteps will help you achieve bakery-level results every time.
Serving Suggestions for Your Fresh Baked Breadsticks
These homemade breads go with just about everything. Here are a few pairing ideas:
- With pasta dishes like lasagna, fettuccine Alfredo, or spaghetti
- Alongside hearty soups such as tomato basil, minestrone, or creamy potato
- With salads like Caesar or mixed greens with vinaigrette
- As a snack with dipping sauces like marinara, garlic butter, or ranch
They also make a fun addition to dinner parties or potlucks—everyone loves fresh bread!
How to Make Garlic Butter for Breadsticks
To achieve that iconic Olive Garden flavor:
- Melt 3 tablespoons unsalted butter
- Stir in ½ teaspoon garlic powder and ½ teaspoon salt
- Brush over warm breadsticks generously
For extra flavor, use garlic salt or add a pinch of Italian seasoning.
Storage Tips: Keeping Your Breadsticks Fresh
- Store in an airtight container at room temperature for up to 3 days
- Reheat in the oven at 300°F for 5–7 minutes for that fresh-baked feel
- You can also microwave for 10–15 seconds, but this may soften the crust too much
To preserve their texture, avoid storing in the fridge—they’ll dry out faster.
Freezing and Reheating Breadsticks the Right Way
Want to make a big batch ahead of time?
To Freeze Unbaked:
- Shape the breadsticks and freeze on a baking sheet
- Once frozen, transfer to a zip-top freezer bag
- Bake directly from frozen, adding a few extra minutes to baking time
To Freeze Baked:
- Let them cool completely
- Wrap in foil and place in a freezer bag
- Reheat in the oven at 325°F for 10–12 minutes
Always brush with fresh garlic butter after reheating for the best flavor.
Easy Variations: Cheesy, Herbed, and More
Want to customize your bread sticks recipe? Try these variations:
- Cheesy Breadsticks – Sprinkle grated mozzarella or Parmesan before baking
- Herb-Infused – Add dried oregano, basil, or rosemary to the butter topping
- Spicy Kick – Mix a pinch of cayenne or red pepper flakes into the dough or butter
- Stuffed Breadsticks – Wrap dough around cheese sticks or pepper-free veggie fillings
These homemade bread recipes are a canvas for your creativity.
Are These Breadsticks Vegan or Dairy-Free Friendly?
Yes, with simple swaps:
- Use vegan butter or olive oil in the dough and topping
- Substitute plant-based milk if adding liquid to soften
- Confirm your yeast is vegan (most are)
This recipe is naturally egg-free, making it easy to adapt for different dietary needs.
Nutritional Info and Why Homemade Breads Are Better
Each breadstick (without extra toppings) is:
- Approximately 140–160 calories
- Free of preservatives and artificial flavors
- Lower in sodium than many store-bought options
Making your own homemade bread recipes puts you in control of ingredients, so you can keep things simple and wholesome.
FAQs About Olive Garden Breadsticks
Can I use active dry yeast instead of instant?
Yes, just proof it in warm water with sugar for 5–10 minutes before adding the rest of the ingredients.
Can I double the recipe?
Absolutely! This recipe scales beautifully.
Can I use whole wheat flour?
You can substitute up to half the flour for whole wheat, but expect a denser texture.
How do I keep breadsticks soft after baking?
Store them in a covered container or wrap them in foil after they cool slightly.
Do I need a stand mixer?
Nope! You can knead by hand. It just takes a few extra minutes of elbow grease.
Final Thoughts: Homemade Bread Recipes That Feel Like Dining Out
These Olive Garden Breadsticks are everything a bread lover dreams of—soft, buttery, warm, and fresh from the oven. They’re surprisingly easy to make and taste just like (or better than) the restaurant version. Whether you’re new to baking or a seasoned home chef, this homemade breadsticks recipe is one to keep in your recipe box forever.
With their golden crust, fluffy interior, and irresistible garlic butter finish, these breadsticks are a beautiful example of how simple, homemade food can bring joy to any table.
Call to Action: Share This Recipe & Subscribe for More Homemade Bread Recipes
Did you bake these delicious breadsticks? Share your creations on social media and tag us—we’d love to see! Don’t forget to subscribe to the blog for more easy homemade bread recipes, tips, and comforting meal ideas delivered right to your inbox.
PrintOlive Garden Breadsticks: Ultimate Homemade Recipe
- Total Time: 27
Description
There’s something incredibly comforting about a warm basket of soft, buttery breadsticks.
Ingredients
Dough:
- 1 cup warm water (about 110°F)
- 1 tablespoon granulated sugar
- 1 ½ teaspoons instant yeast
- 2 tablespoons unsalted butter, softened
- 1 ¾ teaspoons salt
- 3 cups all-purpose flour
Topping:
- 3 tablespoons unsalted butter, melted
- ½ teaspoon garlic powder
- ½ teaspoon salt (or garlic salt)
Instructions
Step 1: Activate the Yeast
In a large bowl, combine warm water, sugar, and yeast. Let sit for 5 minutes until foamy. This step proves your yeast is alive and ready.
Step 2: Make the Dough
Add softened butter, salt, and flour to the yeast mixture. Mix until a shaggy dough forms. Knead for 8–10 minutes by hand or 5–6 minutes in a stand mixer until smooth and elastic.
Step 3: First Rise
Place dough in a greased bowl, cover, and let rise in a warm area for 1 to 1½ hours, or until doubled in size.
Step 4: Shape the Breadsticks
Punch down the dough and divide it into 12 equal pieces. Roll each into a rope about 7–8 inches long and place on a lined baking sheet.
Step 5: Second Rise
Cover and let the shaped breadsticks rise for 30–45 minutes, until puffy.
Step 6: Bake
Preheat oven to 400°F (200°C). Bake breadsticks for 11–13 minutes, or until lightly golden.
Step 7: Garlic Butter Finish
While still warm, brush generously with melted butter mixed with garlic powder and salt. Serve immediately!
Notes
- Measure your flour accurately – Use the spoon and level method to avoid dense dough.
- Don’t over-knead – Too much kneading can make the breadsticks tough.
- Let the dough rise in a warm spot – Like an oven with the light on.
- Brush generously with garlic butter – This is where the flavor shines
- Prep Time: 15
- Cook Time: 12
- Category: Bread
- Cuisine: American
Nutrition
- Serving Size: 12 breadsticks
- Calories: 190
- Fat: 5g
- Carbohydrates: 12g
- Fiber: 1g
- Protein: 1g
Keywords: Olive Garden Breadsticks


