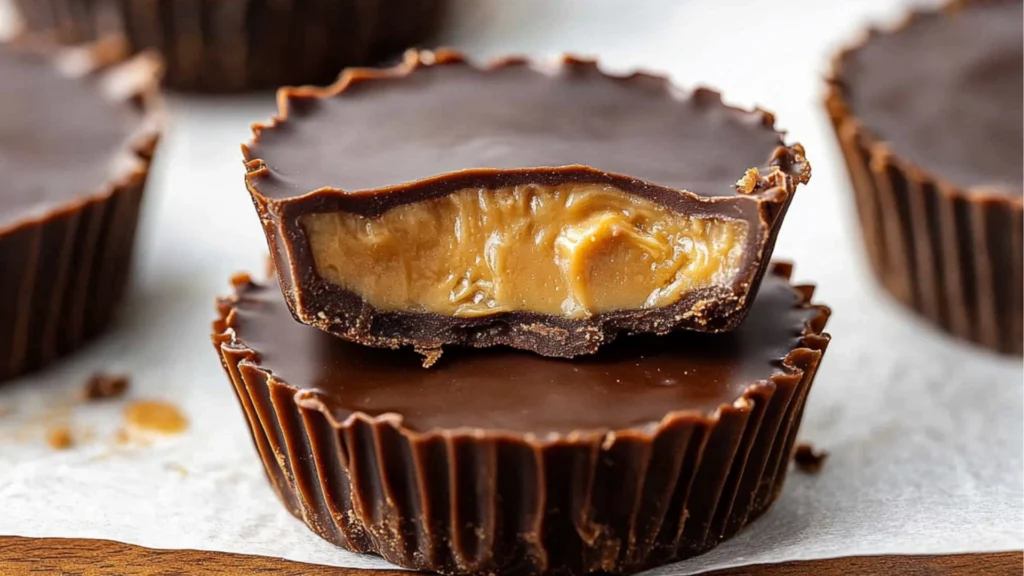
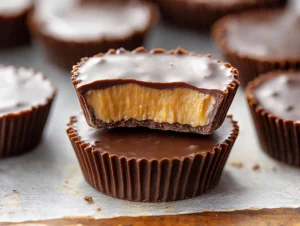
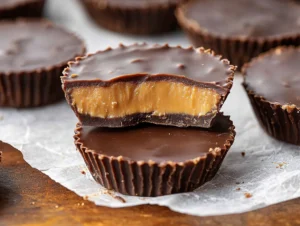
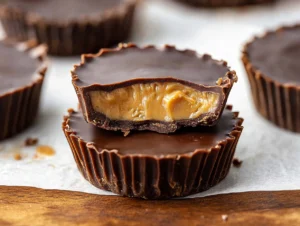
If you love the classic taste of Reese’s Peanut Butter Cups, you’re going to adore this Homemade Peanut Butter Cups recipe! These treats are incredibly easy to make and taste even better than store-bought versions. Plus, they can be made with simple, wholesome ingredients, making them a fantastic option for those who want healthy peanut butter cups without preservatives or additives.
Perfect for chocolate lovers and peanut butter fans alike, this peanut butter cups recipe is a great way to enjoy a homemade version of your favorite candy. Whether you’re making them as a snack, dessert, or edible gift, these chocolate peanut butter recipes will not disappoint!
Why You’ll Love These Homemade Peanut Butter Cups
- Easy to Make – Requires just a few ingredients and simple steps.
- Customizable – Adjust the sweetness, chocolate type, and peanut butter filling to your liking.
- Healthier Alternative – No artificial flavors, preservatives, or excess sugar.
- Perfect for Any Occasion – Great for parties, holidays, or as a homemade gift.
Ingredients for Homemade Peanut Butter Cups
To make these healthy peanut butter cups, you’ll need:
- 1 cup creamy peanut butter (preferably natural or unsweetened)
- ¼ cup honey or maple syrup (for a refined sugar-free option)
- 2 tablespoons melted coconut oil (for a smooth filling)
- 1 teaspoon vanilla extract
- ¼ teaspoon salt
- 2 cups dark or milk chocolate chips
- 1 tablespoon coconut oil (for melting the chocolate)
- Sea salt flakes (optional) for topping
Kitchen Equipment Needed
- Muffin tin
- Paper cupcake liners
- Microwave-safe bowl or double boiler
- Spoon for scooping peanut butter filling
- Small whisk or fork
How to Make Homemade Peanut Butter Cups
-
Prepare the Muffin Tin – Line a muffin tin with paper cupcake liners to prevent sticking and make removing the cups easier.
-
Melt the Chocolate – In a microwave-safe bowl, combine chocolate chips and coconut oil. Microwave in 20-second intervals, stirring in between, until smooth. Alternatively, melt the chocolate using a double boiler.
-
Create the Chocolate Base – Spoon about 1 teaspoon of melted chocolate into each muffin liner, spreading it evenly to cover the bottom. Place the muffin tin in the freezer for 10 minutes to allow the chocolate to set.
-
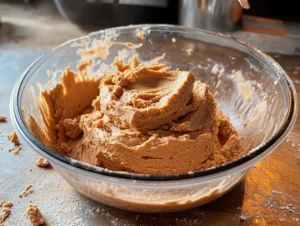
Make the Peanut Butter Filling – In a bowl, mix peanut butter, honey (or maple syrup), melted coconut oil, vanilla extract, and salt until well combined.
-
Add the Peanut Butter Layer – Remove the muffin tin from the freezer and add a teaspoon of peanut butter filling on top of the hardened chocolate. Spread gently with the back of a spoon.
-
Seal with More Chocolate – Pour another teaspoon of melted chocolate over the peanut butter layer, ensuring it covers the filling completely. Smooth the tops with a spoon.
-
Chill Until Set – Sprinkle with sea salt flakes if desired, then refrigerate for 30 minutes or until fully set.
-
Enjoy! – Once firm, peel off the paper liners and enjoy your homemade peanut butter cups!
Tips for the Best Homemade Peanut Butter Cups
- Use High-Quality Chocolate – The better the chocolate, the better the taste. Dark chocolate works great for a richer flavor.
- Let Each Layer Set Properly – Freezing the chocolate base before adding peanut butter helps keep the layers distinct.
- Adjust the Sweetness – For a less sweet version, use unsweetened peanut butter and reduce the sweetener.
- Use a Silicone Muffin Pan – This makes removing the cups easier without needing paper liners.
Common Mistakes to Avoid
- Using Too Much Peanut Butter Filling – Overfilling can cause the chocolate to break when removed from the liner.
- Not Freezing Between Layers – Skipping this step can lead to messy, uneven peanut butter cups.
- Melting Chocolate Too Quickly – Always melt in short intervals or use a double boiler to prevent burning.
- Skipping the Coconut Oil – This helps the chocolate stay smooth and prevents it from becoming too hard.
How to Store Homemade Peanut Butter Cups
- Refrigerator – Store in an airtight container for up to 2 weeks.
- Freezer – Freeze for up to 3 months in a sealed container. Let thaw for a few minutes before eating.
- Room Temperature – If stored in a cool, dry place, they will last up to 5 days, but may soften in warm conditions.
Variations and Substitutions
- Dairy-Free Version – Use dairy-free chocolate chips and ensure your peanut butter is dairy-free.
- Keto Peanut Butter Cups – Swap honey or maple syrup for a sugar-free sweetener like monk fruit or erythritol.
- Nut-Free Option – Use sunflower seed butter or tahini instead of peanut butter.
- Crunchy Peanut Butter Cups – Use crunchy peanut butter or mix in chopped peanuts for added texture.
What to Serve with Peanut Butter Cups
These homemade peanut butter cups pair perfectly with:
- A glass of cold milk or a creamy milkshake
- Coffee or hot chocolate for a cozy treat
- Fruit platter for a balanced dessert
- Ice cream as a fun topping
Presentation Ideas for a Stunning Display
- Arrange them on a dessert platter with other homemade candy recipes.
- Drizzle with extra melted chocolate for a gourmet touch.
- Wrap in gold foil or mini gift boxes for a beautiful homemade gift.
- Stack them in a tiered candy dish for parties.
Frequently Asked Questions
1. Can I use white chocolate instead?
Yes! White chocolate peanut butter cups are delicious and look stunning.
2. How can I prevent the chocolate from cracking?
Make sure the peanut butter layer is not too cold before adding the top layer of chocolate.
3. Can I make these peanut butter cups vegan?
Absolutely! Use dairy-free chocolate and maple syrup instead of honey.
4. What kind of peanut butter works best?
A natural, creamy peanut butter without added sugar or oil is ideal.
5. Do I need to temper the chocolate?
Not necessarily! If you’re storing them in the fridge, the chocolate will stay firm without tempering.
Final Thoughts
These Homemade Peanut Butter Cups are a delicious, healthier alternative to store-bought candy. Whether you’re craving a quick snack, looking for peanut butter desserts, or wanting to make candy recipes homemade, this recipe is sure to impress!
Try making them today, and don’t forget to share this recipe with friends! If you loved it, subscribe to our blog for more delicious chocolate peanut butter recipes and dessert ideas!
Homemade Peanut Butter Cups : Healthier & Delicious
If you love the classic taste of Reese’s Peanut Butter Cups, you’re going to adore this Homemade Peanut Butter Cups recipe!If you love the classic taste of Reese’s Peanut Butter Cups, you’re going to adore this Homemade Peanut Butter Cups recipe!
- Muffin tin
- Paper cupcake liners
- Microwave-safe bowl or double boiler
- Spoon for scooping peanut butter filling
- Small whisk or fork
- To make these healthy peanut butter cups (you’ll need:)
- 1 cup creamy peanut butter (preferably natural or unsweetened)
- ¼ cup honey or maple syrup (for a refined sugar-free option)
- 2 tablespoons melted coconut oil (for a smooth filling)
- 1 teaspoon vanilla extract
- ¼ teaspoon salt
- 2 cups dark or milk chocolate chips
- 1 tablespoon coconut oil (for melting the chocolate)
- Sea salt flakes (optional for topping)
- Prepare the Muffin Tin – Line a muffin tin with paper cupcake liners to prevent sticking and make removing the cups easier.
- Melt the Chocolate – In a microwave-safe bowl, combine chocolate chips and coconut oil. Microwave in 20-second intervals, stirring in between, until smooth. Alternatively, melt the chocolate using a double boiler.
- Create the Chocolate Base – Spoon about 1 teaspoon of melted chocolate into each muffin liner, spreading it evenly to cover the bottom. Place the muffin tin in the freezer for 10 minutes to allow the chocolate to set.
- Make the Peanut Butter Filling – In a bowl, mix peanut butter, honey (or maple syrup), melted coconut oil, vanilla extract, and salt until well combined.
- Add the Peanut Butter Layer – Remove the muffin tin from the freezer and add a teaspoon of peanut butter filling on top of the hardened chocolate. Spread gently with the back of a spoon.
- Seal with More Chocolate – Pour another teaspoon of melted chocolate over the peanut butter layer, ensuring it covers the filling completely. Smooth the tops with a spoon.
- Chill Until Set – Sprinkle with sea salt flakes if desired, then refrigerate for 30 minutes or until fully set.
- Enjoy! – Once firm, peel off the paper liners and enjoy your homemade peanut butter cups!
Use High-Quality Chocolate – The better the chocolate, the better the taste. Dark chocolate works great for a richer flavor.
Let Each Layer Set Properly – Freezing the chocolate base before adding peanut butter helps keep the layers distinct.
Adjust the Sweetness – For a less sweet version, use unsweetened peanut butter and reduce the sweetener.