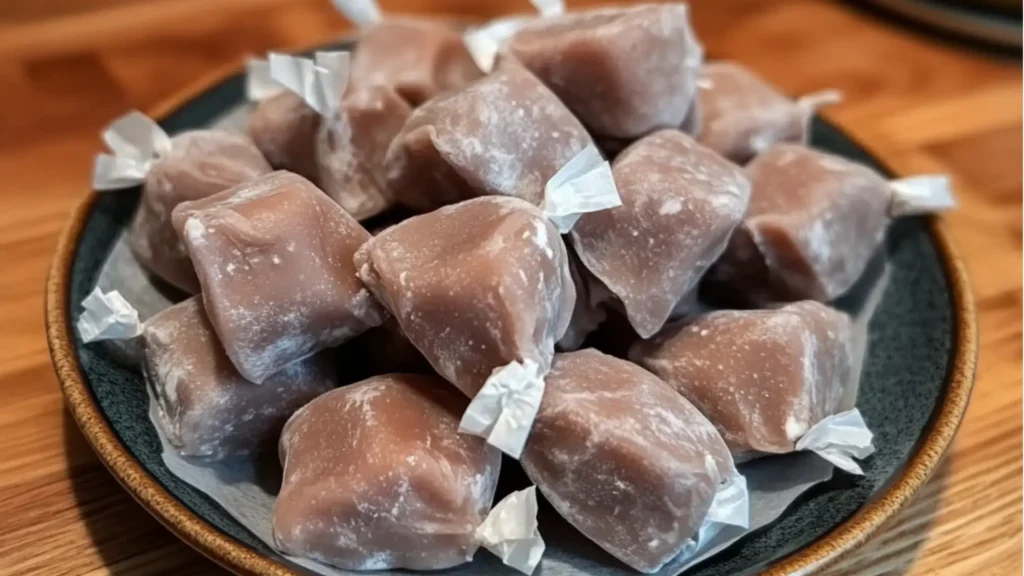
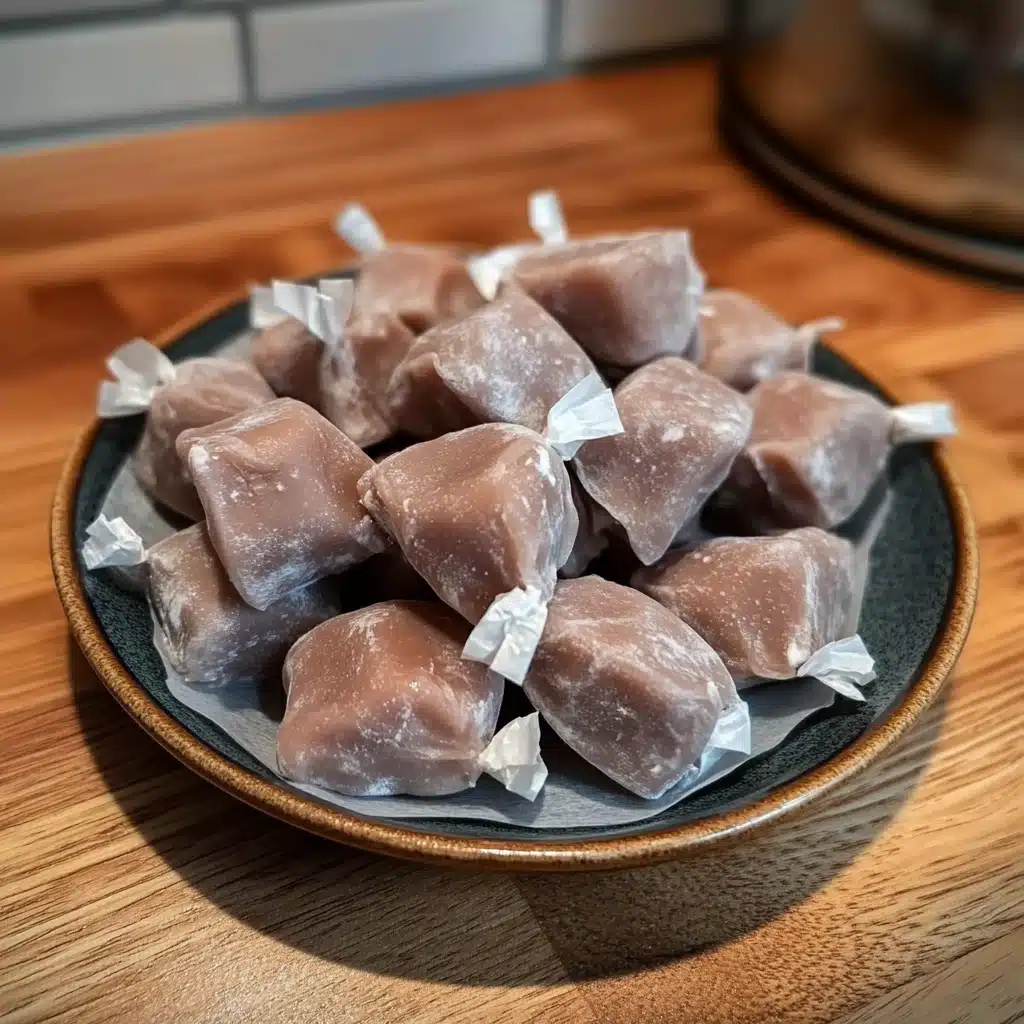
There’s something nostalgic and utterly delightful about homemade caramels. These soft, buttery treats are melt-in-your-mouth delicious and make the perfect addition to your holiday candy tins, gifts, or cozy winter evenings. Whether you’re making them for a festive occasion or simply to indulge your sweet tooth, this recipe brings all the charm of traditional caramel candy, without the fuss.
This recipe is for anyone who craves that silky, chewy texture of caramel you remember from childhood — and yes, it’s completely doable at home with just a handful of pantry staples. If you’ve never made candy before, don’t worry — we’ll walk you through each step and share helpful tips, tricks, and common mistakes to avoid.
Ready to impress your friends, neighbors, and your taste buds? Let’s dive into how to make the best homemade caramels ever!
Table of Contents
What Makes This Homemade Caramel Recipe So Good?
This recipe creates soft, chewy, buttery caramels that are better than store-bought and more affordable too. The rich golden color, the silky texture, and that signature flavor come from slowly simmering butter, sugar, and cream until perfectly thickened.
You don’t need a candy thermometer (although it helps), and the process is simpler than you’d expect, especially with our detailed instructions. These are also ideal for holiday treat boxes alongside recipes like Pumpkin Truffles or Apple Crisp with Oatmeal.
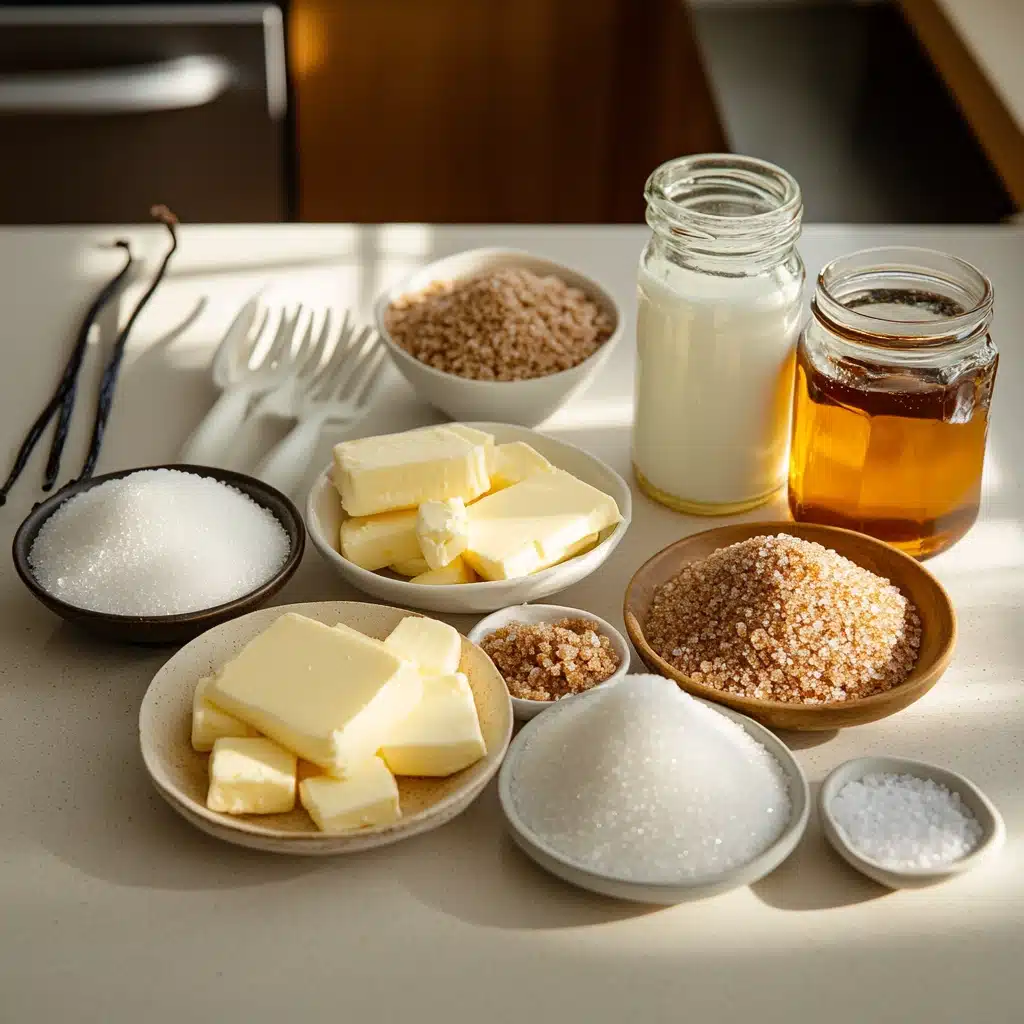
Ingredients for Homemade Caramels
Here’s everything you’ll need to make a batch of about 60 bite-sized pieces:
- 1 cup (226g) unsalted butter
- 2 ¼ cups (450g) packed brown sugar
- 1 cup (240ml) light corn syrup
- 1 (14oz) can sweetened condensed milk
- 1 tsp vanilla extract
- ⅛ tsp salt (optional)
- Flaky sea salt (for topping, optional)
Kitchen Tools You’ll Need
To make smooth and perfect caramels, having the right tools helps. Here’s your checklist:
- Heavy-bottomed saucepan
- Candy thermometer (optional but recommended)
- Wooden spoon or heatproof silicone spatula
- 8×8-inch or 9×9-inch baking pan
- Parchment paper
- Sharp knife or kitchen scissors for cutting
- Wax paper for wrapping (if gifting)
Step-by-Step Instructions
- Prepare your pan: Line your baking dish with parchment paper, allowing some to hang over the sides for easy removal later.
- Melt butter: In a heavy saucepan over medium heat, melt the butter completely.
- Add sugar and syrup: Stir in brown sugar and corn syrup. Stir constantly until sugar has dissolved, about 5 minutes.
- Pour in sweetened condensed milk: Gradually add in the sweetened condensed milk while stirring. Bring the mixture to a gentle boil, stirring constantly.
- Cook to temperature: Keep stirring as the mixture thickens. Cook until it reaches 238°F to 240°F (soft-ball stage) on a candy thermometer. This takes 10–15 minutes. If you don’t have a thermometer, drop a bit of the mixture into cold water—it should form a soft ball.
- Add vanilla: Remove from heat and stir in vanilla (and salt, if using).
- Pour into pan: Carefully pour the hot caramel into your prepared pan and smooth the top. Sprinkle with flaky sea salt if desired.
- Cool completely: Let the caramel sit at room temperature for several hours or until fully set.
- Cut and wrap: Once firm, lift out of the pan using the parchment and cut into small squares. Wrap in wax paper for storage or gifting.
Expert Tips for the Best Caramels
- Use a heavy-bottomed pot to prevent burning. Thin pots heat unevenly and can cause scorched spots.
- Stir constantly to avoid hot spots and uneven cooking.
- Avoid high heat. Patience is key—medium heat allows for better control.
- Don’t overcook. Going past 245°F will make your caramels too hard.
- For precise texture, use a candy thermometer like this tip used in other confections such as Chocolate Marshmallow Swirl Cookies.
Variations and Flavor Ideas
Once you master the base recipe, the options are endless:
- Sea Salt Caramels: Sprinkle flaky sea salt just before the caramels set.
- Vanilla Bean Caramels: Add seeds from one vanilla bean instead of extract.
- Chocolate-Dipped Caramels: Once cooled and cut, dip pieces in melted dark chocolate.
- Espresso Caramels: Add 1 tsp instant espresso powder for a coffee twist.
- Pair these with Keto Peanut Butter Chocolate Fat Bombs for a variety in your treat box.
Common Mistakes to Avoid
- Using too high heat: This causes the sugars to crystallize or burn.
- Not stirring enough: Leads to scorching and uneven cooking.
- Cutting too soon: Always allow full cooling, or your caramels will stick to the knife.
- Wrong temperature: If your thermometer is inaccurate, test using the cold-water method.
How to Store and Gift Caramel Candy
Storage: Wrap each caramel in wax paper and store in an airtight container at room temperature for up to 2 weeks. For longer storage, refrigerate up to 1 month.
Freezing: Layer wrapped caramels in a container with parchment between layers. Freeze for up to 3 months.
Gifting Tip: Package these in festive tins with other homemade sweets like Halloween Brownies or Pumpkin Cheesecake Cookies for a cozy, thoughtful holiday gift.
Food Pairings and Serving Suggestions
Homemade caramels are fantastic on their own, but you can:
- Add them to dessert boards alongside Fruit Dip and Apple Pie Dip
- Chop them up and stir into brownie batter, like in this Brownie Breakfast Bake
- Enjoy with warm drinks like Pumpkin Spice Cold Brew
Frequently Asked Questions (FAQ)
Can I make homemade caramels without corn syrup?
Yes, you can substitute honey or golden syrup, but the texture may vary. Corn syrup prevents crystallization.
Why are my caramels too soft or too hard?
It’s all about the temperature. Too low and they’ll be gooey; too high and they’ll be brittle.
How do I clean the sticky pan after making caramel?
Soak it in hot water. The sugar will dissolve after 10–15 minutes.
Can I double this recipe?
Yes! Use a larger saucepan and cook carefully. Stirring is even more important when doubling.
Do I need a candy thermometer?
It helps with precision, but you can use the cold-water test if you don’t have one.
Why did my caramels turn grainy?
Crystallization likely occurred. Make sure sugar is fully dissolved before boiling, and avoid scraping the sides of the pot during cooking.
Final Thoughts on Homemade Caramels
With a rich, buttery flavor and irresistible texture, these homemade caramels are sure to become a cherished tradition in your kitchen. Whether you’re making them for the holidays or just for fun, they’re guaranteed to impress. Remember to experiment with flavors and don’t be afraid to make extra — they disappear fast!
Want more fun and festive recipes? Check out our easy Crescent Roll Mummy Hot Dogs or Mini Pancake Cereal for family-friendly treats.
If you loved this recipe, please share it with your friends and family, and don’t forget to subscribe to Lyndy’s Kitchen for more homemade goodness!
Print
Irresistibly Chewy Homemade Caramels Recipe : Perfect for Gifting!
- Total Time: 30 minutes + cooling time
- Yield: About 60 pieces 1x
Description
Homemade Caramels are soft, chewy, buttery, melt-in-your-mouth treats perfect for gifting, holiday tins, or cozy winter snacking. Made with simple pantry staples, this nostalgic recipe delivers silky, rich caramel candy that tastes better than store-bought.
Ingredients
- 1 cup (226g) unsalted butter
- 2 1/4 cups (450g) packed brown sugar
- 1 cup (240ml) light corn syrup
- 1 (14 oz) can sweetened condensed milk
- 1 teaspoon vanilla extract
- 1/8 teaspoon salt (optional)
- Flaky sea salt, for topping (optional)
Instructions
- Prepare the pan: Line an 8×8 or 9×9 baking dish with parchment, leaving overhang for easy lifting.
- Melt butter: In a heavy saucepan over medium heat, melt the butter completely.
- Add sugar & syrup: Stir in brown sugar and corn syrup. Cook, stirring constantly, until sugar dissolves.
- Add sweetened condensed milk: Slowly pour in condensed milk while stirring. Bring mixture to a gentle boil.
- Cook to soft-ball stage: Continue stirring and cook until caramel reaches 238–240°F (soft-ball stage). Without a thermometer, test by dropping a bit into cold water—it should form a soft ball.
- Add vanilla: Remove from heat and stir in vanilla and optional salt.
- Pour into pan: Carefully pour caramel into prepared pan and smooth the top. Add flaky salt if desired.
- Cool completely: Let cool at room temperature for several hours until firm.
- Cut and wrap: Lift out using parchment, slice into squares, and wrap in wax paper for storage or gifting.
Notes
- Use a heavy-bottomed pot to prevent scorching.
- Stir constantly for smooth, even caramels.
- Do not cook over high heat—medium heat provides better control.
- Overcooking past 245°F will make the caramels too firm.
- Let cool fully before cutting to avoid sticking.
- Prep Time: 10 minutes
- Cook Time: 20 minutes
- Category: Candy, Dessert, Homemade Gifts
- Method: Stovetop
- Cuisine: American
Nutrition
- Serving Size: 1 piece
- Calories: 70
- Sugar: 10g
- Sodium: 20mg
- Fat: 3g
- Saturated Fat: 2g
- Unsaturated Fat: 0g
- Trans Fat: 0g
- Carbohydrates: 11g
- Fiber: 0g
- Protein: 0g
- Cholesterol: 10mg
Keywords: homemade caramels, soft caramels, chewy caramel candy, Christmas candy, holiday caramels, caramel recipe, brown sugar caramels