If you’re planning a Halloween bash or just want to serve a spooky snack for your family this October, these Cheesy Halloween Breadstick Bones are a frightfully fun treat that will have both kids and adults reaching for more. Soft, cheesy, buttery, and shaped like bones, they’re the perfect addition to any Halloween-themed table. Whether you’re hosting a kids’ Halloween dinner or looking for Halloween food ideas for adults, this recipe delivers both fun and flavor.
This recipe is ideal for parents looking to delight little ghouls and goblins with fun finger food, party planners in need of themed Halloween appetizers, or anyone wanting to enjoy a festive baking day. Plus, they’re super easy to make with store-bought dough!
Let’s dive into this spooky and delicious Halloween breadstick recipe!
Table of Contents

What Are Halloween Breadstick Bones?
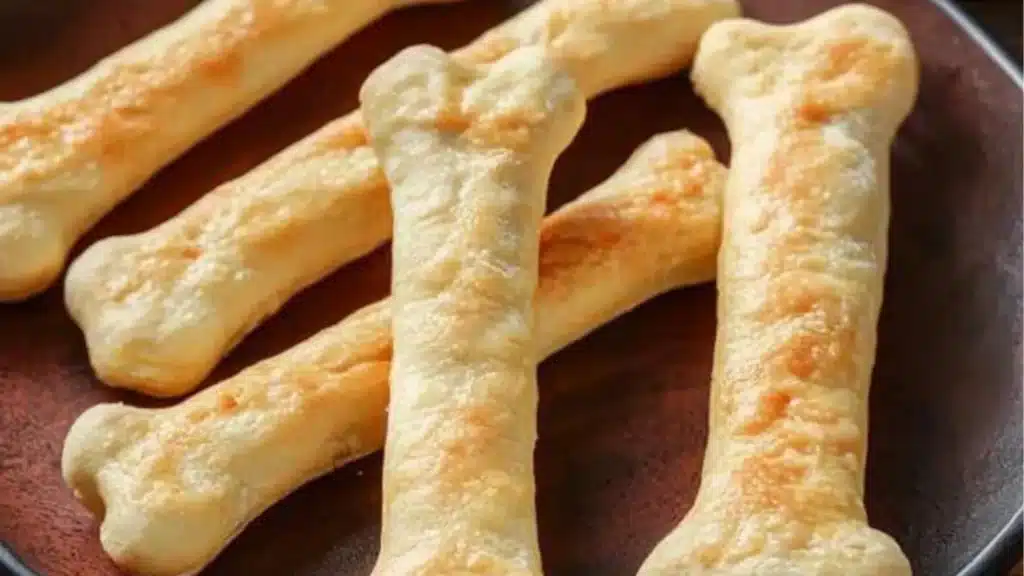
These bone-shaped breadsticks are made from refrigerated pizza dough, twisted and tied to form the “knobs” of bones, then brushed with butter, sprinkled with garlic and parmesan, and baked to golden perfection. The result? A soft, cheesy breadstick that looks like a bone — perfect for a Halloween platter.
Whether you serve them with a blood-red sweet chili sauce or next to a creamy pumpkin dip, these breadstick bones are a spooky centerpiece for any Halloween food spread.
Why This Recipe Is Perfect for Halloween Parties
Halloween is all about creativity — in costumes, decorations, and most importantly, food. This recipe is:
- Festive and themed, making it great for parties and school lunches.
- Easy to make ahead, meaning less stress on party day.
- Loved by all ages, from toddlers to grown-up trick-or-treaters.
- Adaptable — you can make them vegetarian, gluten-free, or add spice if you’d like!
Pair them with Halloween Snack Mix or Snake Charmer Pretzels for a spooky snack board that will leave your guests spellbound.
Ingredients for Cheesy Halloween Breadstick Bones
- 1 can refrigerated pizza dough (about 13.8 oz)
- 2 tablespoons melted butter
- 1/2 teaspoon garlic powder
- 1/4 teaspoon salt
- 1/4 cup grated Parmesan cheese
- 1/2 cup shredded mozzarella cheese (optional, for extra cheesiness)
For dipping (optional but highly recommended):
- Marinara sauce or spicy sweet chili dip
Kitchen Equipment Needed
- Baking sheet
- Parchment paper
- Sharp knife or kitchen scissors
- Small bowl for butter mixture
- Pastry brush
- Oven mitts
- Cooling rack
How to Make Halloween Breadstick Bones
- Preheat the oven to 400°F (200°C). Line a baking sheet with parchment paper for easy cleanup.
- Unroll the pizza dough onto a lightly floured surface. Use a sharp knife or pizza cutter to slice it into 10–12 equal strips.
- Form the bone shape: Cut a small slit on each end of a strip, about 1 inch deep, then roll or tuck each end inwards to form the rounded “bone” shape.
- Place on the baking sheet, spaced slightly apart.
- Brush with melted butter, then sprinkle with garlic powder, salt, Parmesan cheese, and mozzarella if using.
- Bake for 12–15 minutes, or until golden brown and puffy.
- Cool slightly, then serve warm with your favorite spooky dip.
Looking for an extra spooky pairing? Try it with this creepy Halloween brownie dessert for a full themed meal.
Pro Tips for Perfect Breadstick Bones
- Don’t overbake — golden brown is perfect. Too much time in the oven can make them hard instead of soft and chewy.
- Shape the ends well — the more exaggerated the bone ends, the better the effect!
- Use string cheese inside the rolled dough for a fun melted center.
- Add herbs like oregano or rosemary for flavor and a pop of color.
Serving Suggestions and Party Ideas
Arrange your breadstick bones on a wooden board with a bowl of marinara “blood” sauce in the middle.
- Add some cauldron cookies or mini Halloween pizzas for a themed platter.
- Include fun name cards like “Witch’s Fingers” or “Zombie Bones” for an extra spooky touch.
- Pair with Garlic Parmesan Chicken Skewers for a complete party tray.
Make It Kid-Friendly
These are perfect for kids’ Halloween lunches or class parties. Make smaller versions by cutting the strips in half. Serve with fruit dip and mini pumpkin breads for a sweet and savory combo.
For picky eaters, skip the garlic and use just butter and cheese.
Fun Variations
- Cheesy Jalapeño Bones – Add sliced jalapeños and extra cheese before baking for a spicy adult version.
- Sweet Bones – Swap garlic for cinnamon sugar and pair with pumpkin fluff dip.
- Stuffed Bones – Fill with mozzarella, pepperoni, or even mashed sweet potatoes.
Try serving them alongside a warm bowl of Pumpkin Chicken Chili for a cozy Halloween dinner.
Presentation Tips
- Plate on a black or skull-themed tray for drama.
- Use edible fake “spiders” or Halloween props as decoration.
- Create a “bone graveyard” theme with black paper shreds and food labels.
- Use dipping sauces in mini cauldrons or test tubes for a mad scientist vibe.
These ideas will elevate your Halloween food table into something unforgettable!
Storage and Make-Ahead Tips
- To store: Place in an airtight container at room temperature for up to 2 days or in the fridge for up to 5 days.
- To reheat: Warm in a 300°F oven for 5–7 minutes until heated through.
- To freeze: Flash freeze on a baking tray, then store in a freezer bag for up to 1 month. Reheat from frozen.
You can also prepare them a day in advance and bake them just before your guests arrive.
Perfect Pairings for a Halloween Spread
Complement your Cheesy Halloween Breadstick Bones with:
- Pumpkin Cheesecake Cookies
- Pumpkin Twists
- Halloween Donuts
- Ghost Brown Butter Cookies
- Crack Breakfast Casserole for a morning-after snack!
Looking for drinks? Try Lavender Lemonade or Strawberry Cream Soda — fun, festive, and alcohol-free!
Common Mistakes to Avoid
- Skipping parchment paper – dough can stick and ruin the shape.
- Undercooking – watch for doughy centers.
- Overstuffing with cheese – too much can leak out and burn.
- Crowding the pan – space them out for even baking.
FAQs About Cheesy Halloween Breadstick Bones
Can I make these ahead of time?
Yes! You can shape and refrigerate them unbaked up to 24 hours ahead. Bake fresh before serving.
Can I use homemade dough?
Absolutely. If you have a favorite pizza dough recipe, go for it!
What dip goes best?
Marinara, ranch, garlic butter, or even pumpkin hummus are all delicious choices.
Can I make them gluten-free?
Yes — use gluten-free pizza dough and follow the same instructions.
Final Thoughts + Call to Action
These Cheesy Halloween Breadstick Bones are scary simple, wildly delicious, and guaranteed to be a crowd favorite. Whether you’re preparing food for a Halloween party for kids, looking for cute Halloween snack ideas, or making themed appetizers for adults, this easy recipe adds spooky flair and cheesy goodness to your menu.
If you enjoyed this recipe, don’t forget to share it with friends, pin it, and subscribe to the blog for more Halloween food inspiration like Monster Eyeball Pizza and Halloween Brownies.
Print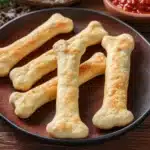
Irresistible Cheesy Halloween Breadstick Bones – The Ultimate Spooky Snack for All Ages
- Total Time: 25 minutes
- Yield: 8 breadstick bones 1x
- Diet: Vegetarian
Description
Buttery, cheesy, and shaped like bones, these Cheesy Halloween Breadstick Bones are the perfect balance of creepy and cute. Made with refrigerated pizza dough, brushed with garlicky butter, and finished with melty cheese, they’re party-ready in under 30 minutes and pair perfectly with marinara or ranch.
Ingredients
- 1 can (13.8 oz) refrigerated pizza dough
- 2 tablespoons butter, melted
- 1/2 teaspoon garlic powder
- 1/2 cup shredded mozzarella or Parmesan cheese
- Optional: Marinara or ranch for dipping
Instructions
- Preheat & prep: Heat oven to 375°F (190°C). Line a baking sheet with parchment paper.
- Portion dough: Unroll pizza dough on a lightly floured surface. Slice lengthwise into 8 equal strips.
- Shape bones: On each strip, cut a 1-inch slit at both ends. Roll the two end tabs inward in opposite directions to create rounded “bone” ends.
- Season & bake: Transfer to the sheet. Brush with melted butter and sprinkle with garlic powder. Bake 12–15 minutes, until puffed and lightly golden.
- Add cheese: Remove briefly, sprinkle each breadstick with cheese, and return to the oven 2–3 minutes, just until melted.
- Serve: Enjoy warm with marinara, ranch, or your favorite spooky dip.
Notes
- Best texture: Bake until golden (not dark). For extra shine, brush with a little garlic butter after baking.
- Flavor twists: Add Italian seasoning or rosemary; swap mozzarella for Parmesan for a crispier top; sprinkle chili flakes for heat.
- Kid fun: Let little hands help roll the “bone” ends—or use Halloween cookie cutters for bats and mummies.
- Make ahead: Shape bones and refrigerate on a tray; bake just before serving.
- Storage: Cool completely. Store airtight up to 2 days at room temp or 4 days in the fridge. Reheat at 350°F (175°C) for 5–7 minutes. Freeze up to 1 month; reheat from frozen.
- Common pitfalls: Don’t overstuff with cheese; pat fresh mozzarella dry; don’t skip parchment to prevent sticking.
- Prep Time: 10 minutes
- Cook Time: 15 minutes
- Category: Appetizer, Snack, Holiday
- Method: Baked
- Cuisine: American
Nutrition
- Serving Size: 1 breadstick bone
- Calories: 180
- Sugar: 2g
- Sodium: 340mg
- Fat: 8g
- Saturated Fat: 4g
- Unsaturated Fat: 3g
- Trans Fat: 0g
- Carbohydrates: 22g
- Fiber: 1g
- Protein: 6g
- Cholesterol: 20mg
Keywords: Cheesy Halloween Breadstick Bones, Halloween bread recipes, spooky snacks, breadstick bones, Halloween appetizers, kids party food