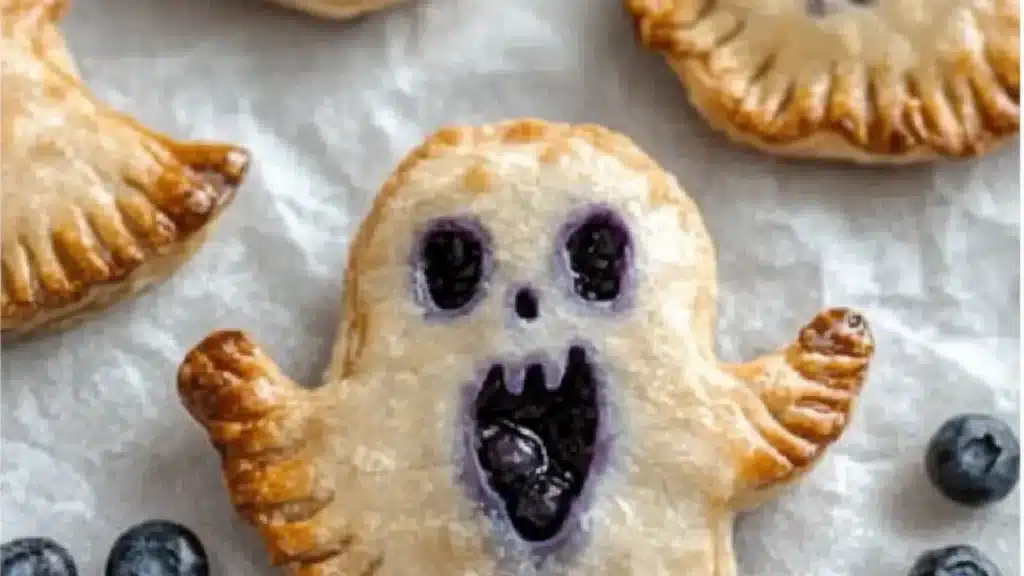
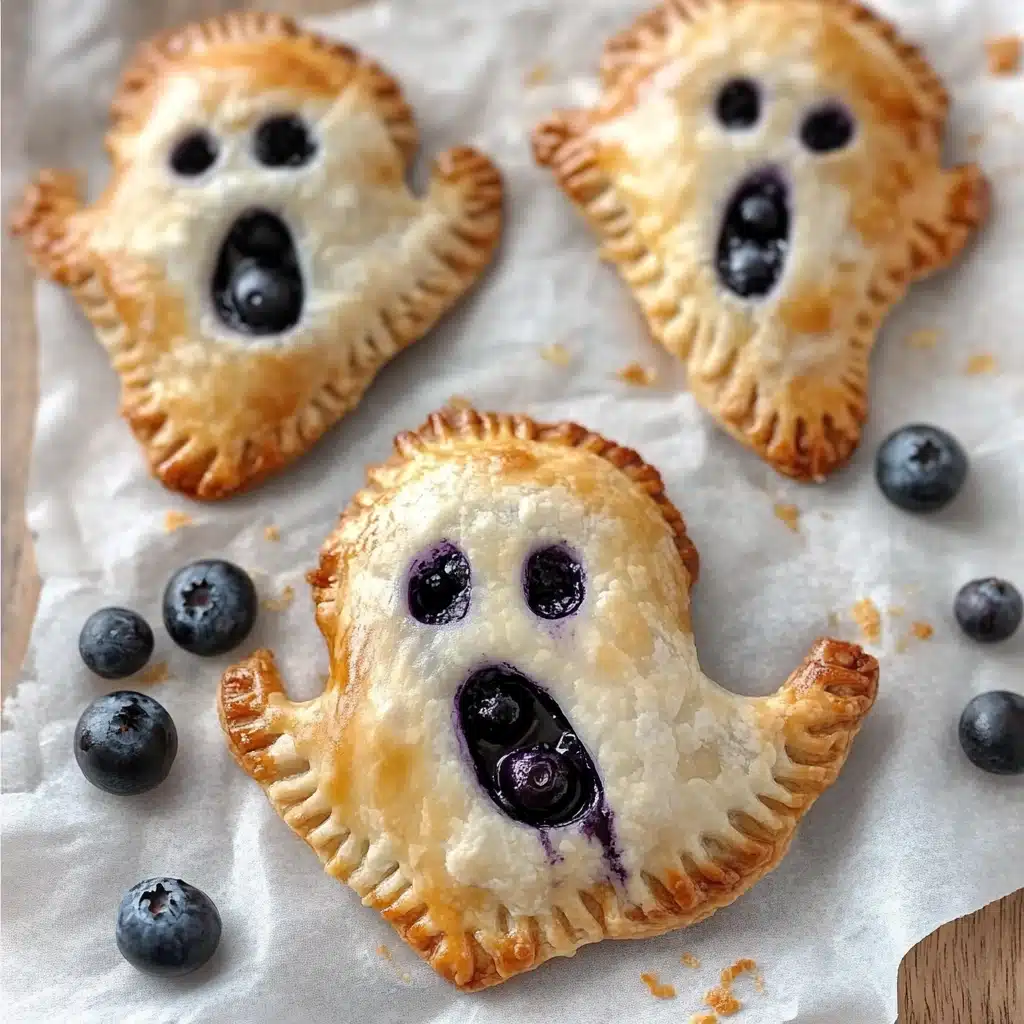
Halloween is the season for all things spooky, sweet, and spectacularly fun. And when it comes to festive baking, nothing beats these Vegan Blueberry Ghost Hand Pies. With their adorable ghost-shaped design, gooey blueberry filling, and flaky golden crust, they’re the ultimate treat for anyone looking to whip up cute easy baked goods that also happen to be dairy-free and optionally gluten-free.
Whether you’re preparing for a Halloween kids party, brainstorming fun fall treats to make, or joining a Halloween bake off, these mini pies are bound to be the star of the dessert table. Plus, they’re easy enough to get the kids involved—making them perfect for your collection of fall recipes for kids.
Table of Contents

Why These Mini Halloween Pies Are Perfect for Kids and Adults Alike
These ghost hand pies are not only cute—they’re absolutely delicious. The sweet and tangy blueberry filling contrasts beautifully with the buttery, flaky crust. And because they’re small, hand-held, and mess-free, they’re perfect for lunchboxes, bake sales, party trays, or festive after-dinner bites.
Even better, their spooky shape makes them ideal Halloween kids party food snacks. They’re a treat and a craft all in one—let the little ones help cut out the ghost shapes or paint on eyes with dairy-free chocolate!
Looking for more holiday-ready pies? You’ll love these Mini Pumpkin Bread with Cinnamon Swirl—they’re another kid-approved fall favorite.
What You’ll Love About This Fall-Themed Baking Idea
There are so many reasons to fall in love with these Vegan Blueberry Ghost Hand Pies:
- Easy to customize with different fillings and shapes
- Perfectly portioned for kids and adults alike
- Vegan-friendly and optionally gluten-free
- A great project for holiday baking or rainy day fun
- Ideal for autumn recipes gluten free collections
- Freezer-friendly for make-ahead dessert planning
If you’re putting together a menu of Easy Thanksgiving Desserts Gluten Free, these hand pies make a playful addition.
Ingredients Needed for Vegan Blueberry Ghost Hand Pies
Here’s everything you’ll need to make your ghostly treats:
For the Dough:
- 2 1/4 cups all-purpose flour (or gluten-free 1:1 blend)
- 1/2 teaspoon salt
- 3 tablespoons granulated sugar
- 3/4 cup vegan butter (cold and cubed)
- 5–6 tablespoons ice water
For the Blueberry Filling:
- 1 1/2 cups fresh or frozen blueberries
- 3 tablespoons maple syrup or granulated sugar
- 1 tablespoon cornstarch
- 1/2 teaspoon lemon juice
- 1/4 teaspoon cinnamon (optional)
For Decoration:
- Dairy-free milk (for brushing)
- Vegan chocolate chips or black edible gel for eyes
Want a shortcut? Use a pre-made vegan pie crust and save even more time, especially when prepping for a Halloween Bake Off or themed school event.
How to Make Vegan Blueberry Ghost Hand Pies Step-by-Step
Step 1: Prepare the Pie Dough
In a large bowl, whisk together flour, salt, and sugar. Add the cold vegan butter and use a pastry cutter or your hands to blend until it resembles coarse crumbs. Gradually add ice water, one tablespoon at a time, mixing until the dough just comes together.
Divide the dough into two discs, wrap them in plastic, and chill for 30 minutes.
Step 2: Make the Blueberry Filling
While the dough chills, combine blueberries, maple syrup, cornstarch, lemon juice, and cinnamon in a saucepan over medium heat. Cook until the mixture thickens, about 5–7 minutes. Set aside to cool completely.
Step 3: Roll and Cut the Ghosts
Preheat your oven to 375°F (190°C). Roll out the chilled dough on a floured surface. Using a ghost-shaped cookie cutter (or make your own template), cut out an even number of shapes.
Step 4: Assemble the Hand Pies
Spoon about 1 tablespoon of filling into the center of half the ghost cutouts, leaving room at the edges. Brush the edges with a bit of water or plant milk, then top with another ghost cutout. Press the edges with a fork to seal.
Use a straw or piping tip to cut out two eye holes (or skip this and paint them on later).
Step 5: Bake
Place the pies on a parchment-lined baking sheet. Brush with plant milk and bake for 20–25 minutes or until golden brown.
Step 6: Decorate and Serve
Once cool, use melted vegan chocolate or edible black gel to draw on eyes if you didn’t cut them out earlier. Serve immediately or store as needed.
You can also try the same technique with a pumpkin filling and turn them into spooky Pumpkin Cheesecake Cookies or use the dough for No-Bake Pumpkin Pie Balls.
Tips for Making Cute Easy Baked Goods Every Time
- Work with chilled dough. It’s easier to roll and holds its shape better.
- Cool your filling. Warm filling can make the dough soggy.
- Use parchment paper. It prevents sticking and makes clean-up easier.
- Have fun with designs. Ghosts are great, but bats, pumpkins, or leaves work too.
Make it a baking day with the kids and pair this with Mini Pancake Cereal or Croissant Breakfast Boats for a mix of sweet and savory fun.
Best Dough for Mini Halloween Pies (Gluten-Free Option)
For a gluten-free option, use a trusted 1:1 gluten-free flour blend with xanthan gum included. Make sure to chill it well before rolling. You could also use Pumpkin Zucchini Bread dough or adapt from Cheesy Zucchini Bread by reducing savory elements.
Want another sweet gluten-free option? These Keto Peanut Butter Chocolate Fat Bombs are ideal for guests watching carbs or gluten.
Creative Halloween Bake Off Ideas Using This Recipe
Turn this basic recipe into a full-on bake off submission by:
- Adding colored sanding sugar before baking
- Using different cookie cutter shapes for a themed tray
- Creating a mix of fillings: apple, pumpkin, raspberry
- Stamping spooky messages into the dough with a food-safe alphabet cutter
Need more Halloween inspo? Try these Snake Charmers Pretzels or Puff Pastry Bats for savory-sweet balance.
Serving Ideas for Halloween Kids Party Food Snacks
Serve your hand pies on a spooky-themed platter alongside:
- Pumpkin Fluff Dip with cinnamon chips
- Rice Krispie Treat Ghosts
- A Halloween fruit tray with Fruit Dip
- Monster Eyeball Pizzas for savory balance
These make the perfect addition to any school Halloween party or family movie night snack board.
How to Store and Freeze Vegan Hand Pies
- Store in an airtight container at room temp for up to 2 days.
- Refrigerate for up to 5 days. Reheat in a toaster oven or air fryer for a crispy crust.
- Freeze unbaked or baked hand pies wrapped tightly. Bake frozen pies at 375°F for 25–30 minutes.
Batch-baking? Pair these with Pumpkin Baked Oatmeal for breakfast and your freezer will be fall-ready.
Variations and Fun Fall Treats to Make With the Same Dough
Once you master the dough, you can create other seasonal hand pies:
- Pumpkin pie filling for classic fall vibes
- Apple pie filling for Thanksgiving
- Nut butter and banana for lunchbox-friendly snacks
Try making savory versions too—like mini pot pies or Stuffed Acorn Squash inspired hand pies with roasted veggies.
Autumn Recipes Gluten Free: How to Adapt for Dietary Needs
To keep these ghost hand pies gluten-free:
- Use a gluten-free flour blend with xanthan gum
- Choose certified gluten-free cornstarch and chocolate chips
- Always check your vegan butter brand for gluten-free labeling
If you’re curating a fall-themed baking menu for guests with dietary restrictions, include Pumpkin Cottage Cheese Pancakes or Cottage Cheese Flatbread for savory options.
Common Mistakes to Avoid When Baking Hand Pies
- Overfilling: A little filling goes a long way.
- Skipping chilling: Cold dough prevents spreading and keeps shapes sharp.
- Not sealing edges: This can cause the filling to leak out.
- Underbaking: Make sure the tops are golden for the best texture.
More Fall Recipes for Kids You’ll Want to Try
Looking for more fall fun? Add these to your baking list:
These recipes are easy enough for kids to help with and festive enough to become annual traditions.
Final Thoughts + Share Your Ghost Creations with Us!
These Vegan Blueberry Ghost Hand Pies are sweet, simple, and absolutely spellbinding. Whether you’re baking with your kids, planning a Halloween party, or just in the mood for a creative afternoon in the kitchen, this recipe is the perfect pick. They’re flaky, fruity, festive—and a guaranteed hit with ghosts and goblins of all ages.
If you loved this recipe, share it with your friends and tag your creations online! Don’t forget to subscribe to the blog for more fall-themed baking ideas that are fun, allergy-friendly, and full of flavor.
Print
Vegan Blueberry Ghost Hand Pies: The Cutest Fall Treat You’ll Ever Bake
- Total Time: 50 minute
Description
This Pumpkin Snickerdoodle Snack Cake is a cozy fall dessert—soft, warmly spiced, and topped with a delicate cinnamon–sugar crust reminiscent of classic snickerdoodles. Moist with real pumpkin puree and studded with melty chocolate chips, it’s simple to make and perfect for dessert tables, coffee breaks, or casual gatherings.
Ingredients
For the Cake Batter:
- 1/2 cup unsalted butter, melted
- 1 cup light brown sugar, packed
- 1 large egg
- 1 cup canned pumpkin puree (not pumpkin pie filling)
- 1 1/2 cups all-purpose flour
- 1/2 teaspoon baking soda
- 1/2 teaspoon baking powder
- 1 1/2 teaspoons ground cinnamon
- 1/2 teaspoon ground nutmeg
- 1/2 teaspoon salt
- 3/4 cup semi-sweet chocolate chips
For the Cinnamon Sugar Topping:
- 1 tablespoon granulated sugar
- 1/2 teaspoon ground cinnamon
Instructions
- Preheat & Prep: Preheat oven to 350°F (175°C). Grease or line an 8×8-inch baking dish with parchment paper.
- Mix Wet Ingredients: In a large bowl, whisk melted butter and brown sugar until smooth. Add the egg and pumpkin puree; whisk to combine.
- Add Dry Ingredients: In a separate bowl, whisk flour, baking soda, baking powder, cinnamon, nutmeg, and salt. Fold the dry mixture into the wet just until combined.
- Fold in Chips: Gently stir in the chocolate chips; do not overmix.
- Pan: Spread the batter evenly into the prepared baking dish.
- Topping: Mix granulated sugar and cinnamon; sprinkle evenly over the batter.
- Bake: Bake 30–35 minutes, or until a toothpick inserted in the center comes out clean. Edges should be lightly golden with a subtle crackle on top.
- Cool & Serve: Cool in the pan for 15 minutes. Slice into squares and serve warm or at room temperature.
Notes
Tips for Best Results
- Use pure pumpkin puree, not pumpkin pie filling.
- Once flour is added, mix just until combined to avoid a dense texture.
- Try browning the butter for deeper, nutty flavor.
- Let the cake rest before slicing for cleaner edges.
- Optional crunch: add chopped walnuts or pecans.
Common Mistakes to Avoid
- Overbaking dries the cake—start checking at 30 minutes.
- Don’t skip the cinnamon–sugar topping; it’s key to the snickerdoodle vibe.
- Avoid too many mix-ins to maintain tender texture.
Variations & Swaps
- Swap chocolate chips with white chocolate, cinnamon chips, or toffee bits.
- Add 1/2 cup chopped pecans or walnuts for a nutty twist.
- Swirl in a little spiced pumpkin butter before baking.
- Mini version: bake in muffin tins for snack-sized treats.
Serving Ideas
- Dust with powdered sugar for a simple finish.
- Serve warm with vanilla yogurt or whipped topping.
- Cut into mini squares and serve in cupcake liners for parties.
Storage
- Room Temp: Airtight container up to 3 days.
- Fridge: Up to 5 days; bring to room temp before serving.
- Freeze: Wrap slices; freeze up to 2 months. Thaw at room temp or warm briefly.
Pairings (Non-Alcoholic)
- Pumpkin Spice Coffee Creamer in your morning coffee
- Brown Sugar Shaken Espresso
- Lavender Lemonade
- Strawberry Cream Soda
FAQs
- Can I double it? Yes—use a 9×13-inch pan; add 5–10 minutes to bake time.
- Gluten-free? Use a 1:1 GF baking flour; add a pinch of xanthan gum if needed.
- No chocolate chips? Still delicious with the cinnamon–sugar topping alone.
- Make-ahead? Keeps well for several days and tastes even better the next day.
- Cook Time: 30–35 minutes
- Category: Dessert
- Method: Baked